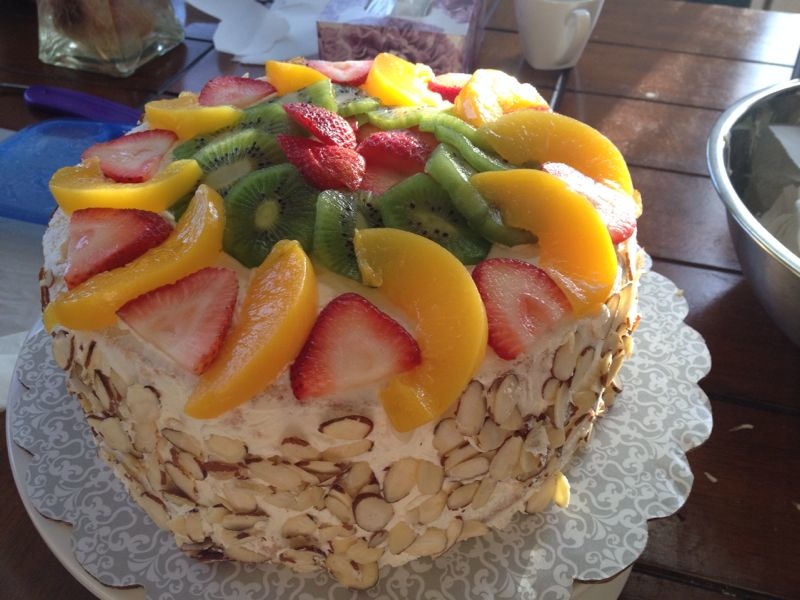
Fruit-topped Spongecake Récipé (yes, I made this)

I baked this cake several times, surprised even myself – it’s like programming, but you eat it.
Adapted from Eat Now, Cry Later (follow her YouTube channel!), with KitchenAid timings, and a bit of organization into “components”. Easy for engineers to follow. Follow from top to bottom.
This is a big cake, it can feed 10 people I reckon. Which is why, through a happy accident, in a future post I will show how I’ve hacked this recipé into what I think is a better implementation (re-factor, anyone?) that is more adaptable to party size.
MIX #1
* 8 egg yolks
* 1 cup caster sugar
- mix until yellow and ribbony
- whisk KitchenAid #4 for 30 seconds
- spatula the sides in
- whisk for another 10 seconds
MIX #2
* 0.5 cup vegetable oil
* 2 tablespoon orange juice
* 1.5 teaspoon vanilla extract
* 0.75 tablespoon water
MIX #3
* 1 cup + 2 tablespoon cake flour (sift 3 times)
* 0.5 teaspoon salt
MIX #4
* 10 egg whites
* 0.75 teaspoon cream of tartar
- mix until you see “stiff” peaks
- drop in cream of tartar when whisking
- use teaspoon to dip in, flip the spoon, when the mixture doesn’t drop from the spoon it’s ready
- whisk KitchenAid #4 for 4.5 min
- then whisk KitchenAid #6 for 3 min
MIX #5
* 1 litre heavy whipping cream
* 1 tablespoon of vanilla extract
* 0.75 cup sugar
- whisk at KitchenAid #6 until consistent
- put in fridge for later
BIG MIX
* Big bowl
* Mix #1
* Mix #2
* Mix #3
* Mix #4
- Preheat oven to 350 degrees F
- Put Mix #1 into the big bowl
- Put Mix #2 into the big bowl
- Put Mix #3 slowly mixed into the big bowl
- Slowly fold in bit by bit Mix #4 using a big hand whisker (don’t overfold, keep airy)
- Line bottom of cake pan with parchment paper
- Pour into cake pan, with ungreased sides (do not scrape, let it flow in)
- Put in oven for 30 mins
- Check that it is done by poking a stick in it, it shouldn’t be sticky – poke not only in the outer rim, but also the middle
- When cooked, overturn cake pan on cooling grille, cool for 2 hours
FRUIT #1 (Middle of the Cake)
* 2 kiwis
* 0.5 can of sliced peaches
* 5 strawberries
- chop everything up (diced)
FRUIT #2 (Top of the Cake)
* 3 kiwis
* 0.5 can of sliced peaches
* 5 strawberries
* A handful of sliced almonds or crushed walnuts
- slice the kiwis into rounds
- slice the strawberries
PREPARING THE CAKE FOR FROSTING
- use a knife on the inner edge of the pan to separate the cake from the cake pan
- release the latch on the cake pan, remove the cake
- using a cake leveller, level the top of the cake
- using the cake leveller again, slice the cake in half
- line a whole cake tray with parchment paper (cut into 4 equal pieces for easy removal later)
- put the bottom half of the cake onto the cake tray (on top of the parchment paper)
FROSTING THE MIDDLE OF THE CAKE
- take some of Mix #5 and mix in with Fruit #1, have a balanced amount between the whipped cream and fruit
- spread the mixture on the bottom half of the cake, make sure to frost not to the edges but only close to it
- put the top half of the cake on top of the bottom half
FROSTING THE TOP AND SIDES OF THE CAKE
- take some of Mix #5 and spread all over the top of the cake and sides, repeat if necessary
- use a glass of lukewarm water to dip your spreader in occasionally
- it’s ok if the sides still show some of the cake, this will be hidden with the almonds or walnuts later
- once you have spread the frosting all over, it’s time to arrange the fruit
- starting with a circular pattern, arrange Fruit #2 all over the top of the cake (or whatever way!)
- spread the sliced almonds or crushed walnuts all over the sides of the cake (you don’t need to completely cover it)
- finally, remove the parchment paper from the bottom of the cake

